
While there are so many Javascript frameworks are available , there is well known javascript progressive framework named as VueJS and it is getting huge popularity among developers because of its small size. The size of this framework is 18–21KB and it takes no time for the user to download and use it. You can compare it with others available frameworks on google. This blog is not about telling advantages of using vue but setting up your first vue project using typescript. When this article was written NodeJS was at version v8.11.1 and npm version 5.6.0
- Setup Node and visual studio code on your system.
- Create a folder with <project-name> and open this folder in VSCode.
- Add a license file, This file will include licensing information about the project.
- Add a README.md file, this file will contain the information concerning the project.
- Now, add an index.html file, for single page application this will only be base html file. Now lets add some html code.
<!DOCTYPE html>
<html lang="en">
  <head>
    <meta charset= "utf-8"> <title>TechCourt </title>
   </head>
   <body>
   </body>
</html>- Next step is to create a file named .editorConfig. We need to add some rules to keep a consistent style for the development team.
root = true
[*]
charset = utf-8
indent_style = space
indent_size = 2
end_of_line = lf
insert_final_newline = true
trim_trailing_whitespace = true
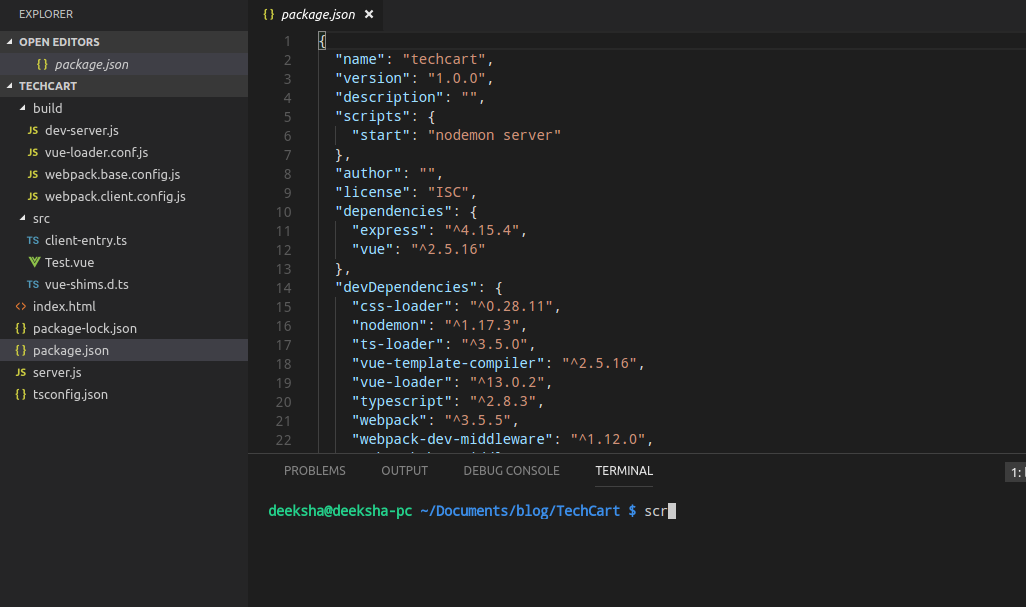
- Basic setup is done now, lets generate package.json, and for doing so, lets open the project folder i.e. <project-name> and open Integrated terminal of vscode and run the command npm init. this will open a setting wizard. lets keep default setting and remove the main key. Now, Lets add “dependencies”:{} and “devDependencies”: {} to package.json. Dependencies section contains the modules which are need at the time of production and development and devDependencies section contains the modules which are needed at the time of development only.
- Now lets move to vue integration and refer vuejs.org. We have to install vue module in our project. Use the command:
npm install vue@2.4.2 –save - We need a web server to launch our index.html. Available web servers are http-server, live-server and ExpressJS etc. I have chosen Express but you can use any of the available web server.
- Install ExpressJS using the command npm install express@4.15.4 –save
- Now it’s time to create the server and for that let’s add server.js file to the project’s root folder.
const express = require("express");
const app = express();
const fs =require("fs")
const path = require("path")
const html = (()=>{
returnfs.readFileSync(path.resolve
  (__dirname,"./index.html"),"utf-8");
})();
app.get('*', (req, res)=>{
  res.write("Hello World!");
  res.end();
});
const port = process.env.PORT || 3000;
app.listen(port,()=>{
  console.log(`server started at http://localhost:${port}`)
})
- Now let’s check if our server is working properly or not, invoke the command: node server.js.
- Now lets add nodemon (utility to watch file changes) to run the server.
npm install nodemon@1.17.3 –save-dev and update package.json script section
“start”:”nodemon server” - Since we are making this project using typescript, let’s add tsconfig.json
{
  "compilerOptions":
   {
     "lib": ["dom", "es5", "es2015"],
     "target": "es5",
     "module": "es2015",
     "moduleResolution": "node",
     "sourceMap": true,
     "allowSyntheticDefaultImports": true
   }
}
- Install typescript and ts-loader in your project using the command:
npm install typescript@2.8.3 ts-loader@3.5.0 –save-dev - To automate the build process for bundling, we have a number of tools like webpack, browserify, gulp etc. Here I have chosen webpack. lets go ahead and configure it.
- Create a folder named “build” under root folder. Add a file webpack.base.config.js and install webpack using the command npm install webpack@3.5.5 –save-dev
- Now let’s add the necessary configuration to webpack.base.config.js.
const path = require("path") const config = {
entry: {
  app: path.resolve(__dirname, "../src/client-entry.ts")
},
module: {
  rules: [{
    test: /\.ts$/,
    exclude: /node_modules|vue\/src/,
    loader: "ts-loader",
    options: {
      appendTsSuffixTo: [/\.vue$/]
    }
  }, {
    test: /\.vue$/,
      loader: 'vue-loader'
    }, {
    test: /\.css$/,
      use: ['vue-style-loader', 'css-loader'],
    }, {
    test: /\.scss$/,
      use: ['vue-style-loader', 'css-loader', 'sass-loader'],
    }, {
    test: /\.sass$/,
      use: ['vue-style-loader', 'css-loader', 'sass-loader?indentedSyntax'],
    }, {
    test: /\.(woff2?|eot|ttf|otf)(\?.*)?$/,
      loader: 'url-loader',
    }, {
    test: /\.(png|jpg|gif|svg)$/,
    loader: 'file-loader',
    options: {
      name: '[name].[ext]?[hash]'
    }
  }]
},
resolve: {
  alias: {
    vue: 'vue/dist/vue.js'
  },
    extensions: ['.ts', '.js', '.vue', '.json']
  },
output: {
   path: path.resolve(__dirname, "../dist"),
   publicPath: "/",
     filename: "assets/js/[name].js"
   }
}
module.exports = config
- Create a file webpack.client.config.js.
const base = require("./webpack.base.config")
const config = Object.assign({}, base, {
  plugins: base.plugins || []
})
module.exports = config
- Create vue-loader.conf.js file to build folder which tells our vue loader to use es module not commonjs module.
'use strict'
const utils = require('./utils')
const config = require('../config')
const isProduction = process.env.NODE_ENV === 'production'
const sourceMapEnabled = isProduction ? config.build.productionSourceMap : config.dev.cssSourceMap
module.exports = {
loaders: utils.cssLoaders({
  sourceMap: sourceMapEnabled,
  extract: isProduction
}),
  cssSourceMap: sourceMapEnabled,
  cacheBusting: config.dev.cacheBusting,
  transformToRequire: {
    video: ['src', 'poster'],
    source: 'src',
    img: 'src',
    image: 'xlink:href'
},
  esModule: true
}- Install webpack-dev-middleware and webpack-hot-middleware using following command.
npm install webpack-dev-middleware@1.12.0 webpack-hot-middleware@2.18.2 –save-dev
- Let’s add dev-server.js to the build the folder which creates development middleware.
const webpack = require("webpack")
const clientConfig = require("./webpack.client.config")
module.exports = function setupDevServer(app) {
clientConfig.entry.app = [
 "webpack-hot-middleware/client",
  clientConfig.entry.app
]
clientConfig.plugins.push(
  newwebpack.HotModuleReplacementPlugin(),
  newwebpack.NoEmitOnErrorsPlugin()
)
constclientCompiler = webpack(clientConfig)
app.use(
  require("webpack-dev-middleware")(clientCompiler, {
    stats: {
      colors: true
    }
   })
)
  app.use(require("webpack-hot-middleware")(clientCompiler))
}
- Modify server.js to run this dev server. Add these two lines to server.js
app.use("/dist", express.static(path.resolve(__dirname,"./dist")))
require("./build/dev-server")(app)
- To make the tooling understand about .vue files, lets add vue-shims.d.ts and add following code to this file. Please refer to https://github.com/microsoft/typescript-vue-starter#single-file-components.
declare module "*.vue" {
  import Vue from "vue";
  export default Vue;
}
- Now its time to write the code for bootstrapping the file and component.
- Lets add src folder to root folder and create a file named client-entry.ts.
import Vue from 'vue'
import Test from './Test.vue'
Vue.config.productionTip = false
/* eslint-disable no-new */
new Vue({
   render: (h: any) => h(Test)
}).$mount('#app')
- Now lets write our first component.
<!-- src/components/Test.vue -->
<template>
  <div>
    <p>Hello Testing!</p>
  </div>
</template>
<script lang="ts">
  import Vue from "vue";
  export default Vue.extend({});
</script>
<style>
</style>
- Before you run the code, make sure to add css-loader, vue-template-compiler to your dependencies. npm install css-loader@0.28.11 vue-template-compiler@2.5.16 –save-dev
-
Now, its time to run command npm start , Open browser and type localhost:3000. See the result thereHere is the GitHub link for this project: start writing your vue application using typescript