
Zapier is a tool that helps you automate repetitive tasks between two or more apps—no code necessary.
You can connect two or more apps to automate repetitive tasks without coding or relying on developers to build the integration.
When an event happens in one app, Zapier can tell another app to perform a particular action.
- Save development time
- Gain new integrations daily
- Get exposure to Zapier’s 3 million+ users through our app directory,
- Increase customer retention
Zapier integration –

Zapier asks a few questions about your integration:
Intended Audience: If you’re building an integration to use on your own or inside your company, select Private. Otherwise, always select Public if you want to share this integration with third parties.
Role: Select your relationship to this app. Most public app integrations are built by their internal development teams, but if you want to build an integration for an app you are not affiliated with, you can still build a private integration.
Category: Choose the category that fits your app best. If your app covers multiple categories (for example, if it has both project management tools and social media management tools), choose the category that fits your app’s primary use-case.
Authentication :-
Every Zap starts with App authentication. Users select an app they wish to use, then authenticate their account with that app so Zapier can access their data.
Once users authenticate their account on an app through Zapier, they can use any of that app’s Zap steps without authenticating again. Users may also authenticate an app again if they wish to use additional accounts from an app with Zapier.
If you want to do a Zapier integration, you need to define how the Zapier platform connects to your app to authenticate users, and add an API call where Zapier can test the account authentication. You can test that API call yourself and connect an account to Zapier, which you can then use to test any subsequent Zap Triggers and Actions you add to the integration.
Zapier Supported Authentication Schemes
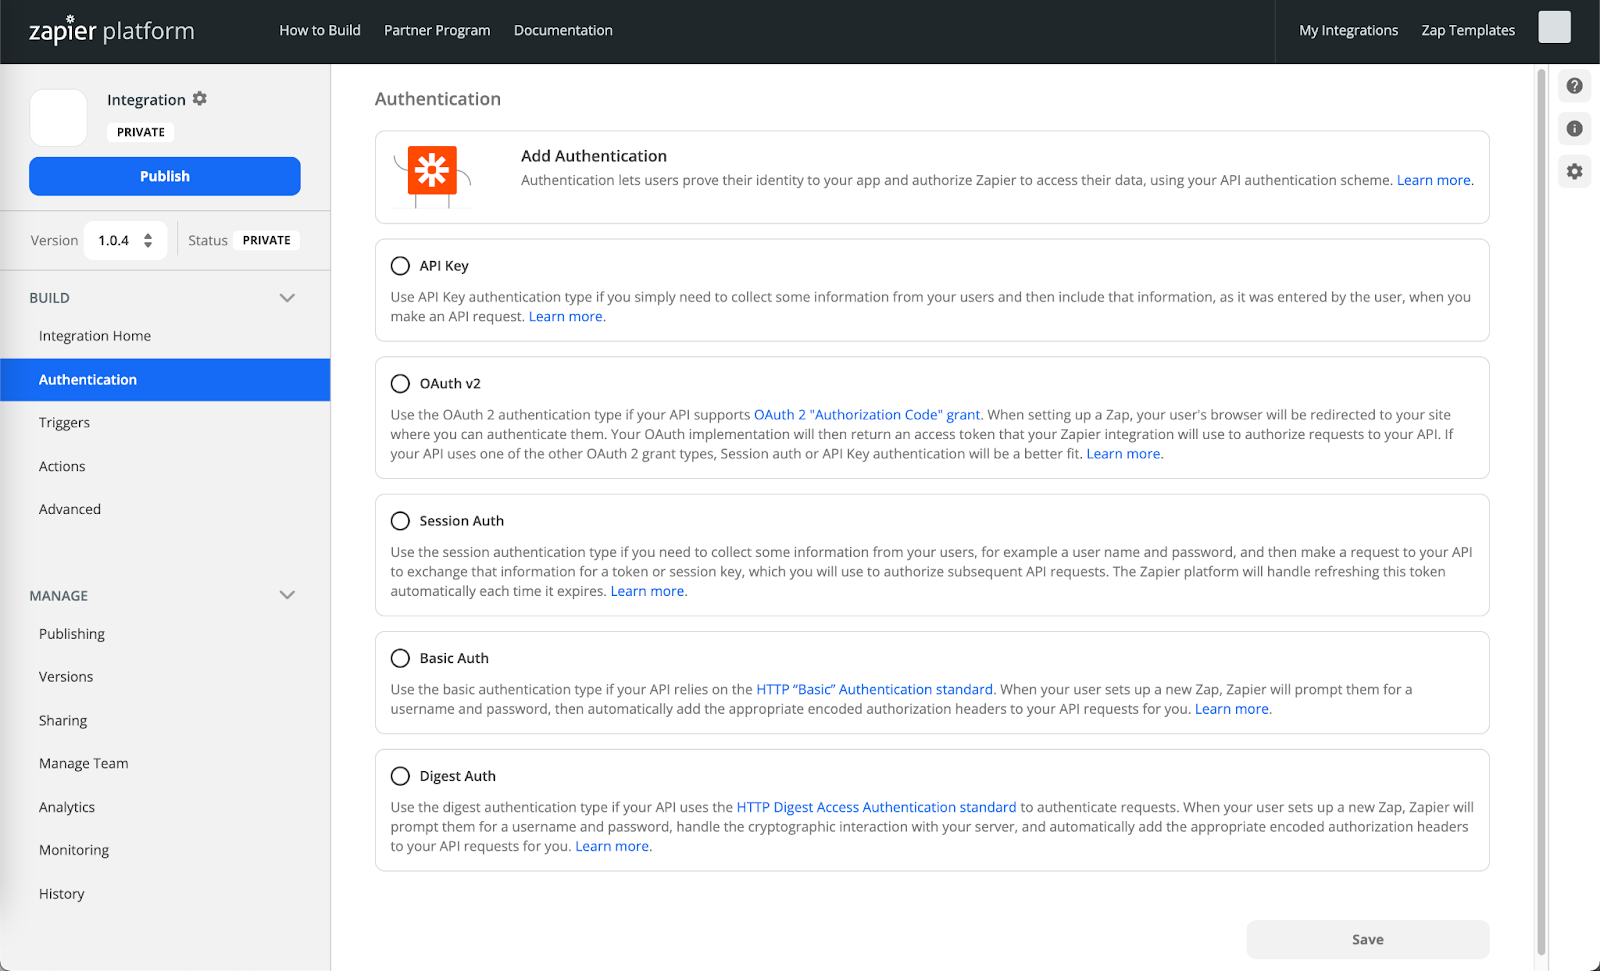
Add authentication to your integration before adding triggers or actions. To do so, click the Authentication tab in the left sidebar of Zapier’s visual builder, then select the authentication scheme your app uses. Zapier supports the following five authentication schemes, each with their own settings:
Session Auth
Session authentication lets users enter their username and password or other app credentials, with optional custom fields if needed for authentication. Zapier then makes an API call to a token exchange URL where Zapier exchanges the credentials for an authentication token, which Zapier will use to authenticate every subsequent API call.
API Key
API key authentication lets users enter a custom API key from your app, and can optionally request additional info such as a domain. Users will need to locate an API key from your app, then enter it in the Zapier authentication form. Zapier will then pass the API key, along with any additional authentication details needed, to authenticate each API call.
OAuth v2
OAuth v2 authentication lets users sign into app accounts and allow Zapier access via a popup window from that app. The app sends a request token before the user authenticates, which Zapier then exchanges for an access token after they authenticate.
Digest Auth
Digest authentication lets users enter their username, password, and other required details for authentication in a Zapier-powered form. Then with every API call, Zapier first runs an API call to request the nonce key, before running the trigger or action’s API call that passes the encrypted authentication details and any other API call data to your app. Zapier handles the nonce and quality of protection details automatically.
In this article, I will show you how to authenticate your integration with your server
Step 1: Creating the Application
make a server directory using terminal
mkdir serverGo to the root folder of your application and type npm init to initialize your app with a package.json file.
cd server
npm init
Step 2 :Install the dependencies
npm install express body-parser corsStep 3:Setting up our web server
Create a new file named server.js in the root folder of the application with the following contents –
const express = require('express');
const cors = require('cors')

// create express app
const app = express();

// parse requests of content-type - application/json
app.use(express.json())

//allows browser client to interact with resources from a different //origin
app.use(cors());

app.get('/', function (req, res) {
    let apiKey = 'api2022!';
    if (apikey == req.headers.apikey) {
       res.status(200).json({status:true,message:'Authenticate successfully' });
        } else {
         res.status(httpStatus.401).json({ status: false, message: 'Invalid Api Key' });
        }

});

// listen for requests
app.listen(3000, () => {
    console.log("Server is listening on port 3000");
});
Now to run the server we can write node server.js in the terminal.
$ node server.js
Server is listening on port 3000
Add an API Key Input Form

Then fill in the fields:
- Label: A user-friendly name for this field. Enter what this value is called inside your app’s UI.
- Is this field required: Check this box for your API key field, and for any other fields that your API requires for authentication.
- Type: Zapier uses the
stringtext field for all input fields by default; and you can use other data type like password. - Help Text: Include details to assist users in authenticating with your app, especially if they may be unsure where to find the data needed.
- Default Value: Include a value for this field to be used as a fallback. For optional fields, the default value is set on initial creation and used instead of missing or null values every time the Zap runs. For required fields, this value is used during Zap creation, but not when the Zap runs

Once you’ve added your input fields, Zapier lists each input field with its label, key, type, and required status on your authentication settings. Click the field to edit it, or click the gear icon and select Delete to remove a field.
When you’ve added the needed forms, click Continue to add a test API call and continue setting up your app’s authentication.
Add a Test API Request

Zapier then needs a way to test the API key and other input field data users enter and ensure it enables a successful API call.
Zapier automatically includes the api key and any additional input fields you added to your input form in the url params. If your api needs that data as headers instead, click Show Options and add the details there instead.

If you need a custom API call, you can switch to code mode and write custom JavaScript code to handle your test API call and the response parsing, if needed. Click the Switch to Code Mode toggle to enable it. The first time you click the toggle, Zapier will convert your API call to code. If you switch back to Form mode, though, Zapier will not convert your code changes to the form mode.
Congratulations! You have successfully created a Zapier integration.